Showing posts with label cake. Show all posts

Saturday, January 30, 2010

First Bake of Year 2010 - Hershey's "Perfectly Chocolate" Chocolate Cake

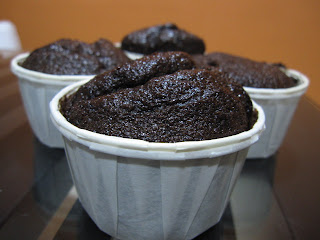
Welcome year 2010! I stopped baking & blogging since school holidays in Nov 2009. Lazy! Haha. Mainly due to I was busy holidaying during Nov & Dec. And when the year started, gosh, I was never been so busy before. This is mainly due to both my boys study at new schools this year - Caden in nursery class at Yuk Yu Kindergarten and Jaden is in Primary 1 at SJK(C) Chung Hwa Likas. Just sending & fetching them to/from schools, to beat the traffic jam itself is a challenging job. On top of that, I was not fully recovered from my cough/flu since Dec 2009. Very, very busy & tiring. Finally last weekend I managed to find some time in a Sunday afternoon. This cake has been in my top of the "must try out" list. I tried to look for Hershey cocoa powder in KK but could not find it until i went to Singapore during X'mas and managed to buy 1 box from there. However, after my Singapore trip, my friend told me that can buy it at Merdeka Supermarket. And it costs slightly cheaper than Singapore Dollars. Sigh! Anyway, I gave it a try and it turned out to be one of my favourite cakes!


It's so moist that I need to double layer the cup cakes.


See how moist the cake is!

I tried the cup cake version. Let's look at the ingredients & steps:

Ingredients:
  • 2 cups sugar (I put 1-3/4 cups. Still very sweet for me. Next time should reduce to 1.5 cups only)
  • 1-3/4 cups all-purpose flour
  • 3/4 cup HERSHEY'S Cocoa
  • 1-1/2 teaspoons baking powder
  • 1-1/2 teaspoons baking soda
  • 1 teaspoon salt
  • 2 eggs
  • 1 cup milk
  • 1/2 cup vegetable oil
  • 2 teaspoons vanilla extract
  • 1 cup boiling water
  • "PERFECTLY CHOCOLATE" CHOCOLATE FROSTING(recipe follows)

Directions:

1. Heat oven to 350°F or 180°C. Grease and flour two 9-inch round baking pans.

2. Stir together sugar, flour, cocoa, baking powder, baking soda and salt in large bowl. Add eggs, milk, oil and vanilla; beat on medium speed of mixer 2 minutes. Stir in boiling water (batter will be thin). Pour batter into prepared pans.

3. Bake 30 to 35 minutes or until wooden pick inserted in center comes out clean. Cool 10 minutes; remove from pans to wire racks. Cool completely. Frost with "PERFECTLY CHOCOLATE" CHOCOLATE FROSTING. 10 to 12 servings.

VARIATIONS:
ONE-PAN CAKE: Grease and flour 13x9x2-inch baking pan. Heat oven to 350° F. Pour batter into prepared pan. Bake 35 to 40 minutes. Cool completely. Frost.

THREE LAYER CAKE: Grease and flour three 8-inch round baking pans. Heat oven to 350°F. Pour batter into prepared pans. Bake 30 to 35 minutes. Cool 10 minutes; remove from pans to wire racks. Cool completely. Frost.

BUNDT CAKE: Grease and flour 12-cup Bundt pan. Heat oven to 350°F. Pour batter into prepared pan. Bake 50 to 55 minutes. Cool 15 minutes; remove from pan to wire rack. Cool completely. Frost.

CUPCAKES: Line muffin cups (2-1/2 inches in diameter) with paper bake cups. Heat oven to 350°F. Fill cups 2/3 full with batter. Bake 22 to 25 minutes. Cool completely. Frost. About 30 cupcakes.


"PERFECTLY CHOCOLATE" CHOCOLATE FROSTING (I omitted this part coz i think the cake is sweet enough.)

1/2 cup (1 stick) butter or margarine
2/3 cup HERSHEY'S Cocoa
3 cups powdered sugar
1/3 cup milk
1 teaspoon vanilla extract

Melt butter. Stir in cocoa. Alternately add powdered sugar and milk, beating to spreading consistency. Add small amount additional milk, if needed. Stir in vanilla. About 2 cups frosting.

Friday, November 13, 2009

Ribena Marble Cheesecake (non-baked)


When I first tried to do the non-baked Oreo Cheesecake, i failed to whip the cream. So I am quite phobia when it comes to preparing cake with whipped creams. When I found this non-baked cheesecake recipe from Happy Home Baking and Loving Baking, I know I must give it a try. The recipe seems simple. The comments I received from my friends who tried it, they simply love it!

(From Happy Home Baking)

Ingredients
Crust:

150g digestive biscuits, finely crushed (I used Marie Biscuits instead coz don't have digestive biscuits at home)
60g butter, melted

Filling:
100ml water

20g (2 tablespoons) gelatin granules/powder
250g cream cheese, soften at room temperature

75g caster sugar
250ml natural plain yogurt

75ml Ribena blackcurrant juice cordial


Topping: (i omitted this. You can refer to
Loving Baking who tried the topping.)
100ml water

2 teaspoons gelatin granules/powder
80ml Ribena blackcurrant juice cordial

Method:

Crust:
  1. Line the sides of a 20cm round pan with aluminium foil (which extends out 2-3 cm at the side of the pan for easily lifting after the cake is chilled), set aside.
  2. To make the crust, combine crushed digestive biscuits and melted butter together in a mixing bowl.
  3. With the back of a spoon, press the biscuit crumbs onto the base of the prepared pan. To ensure the crust is even, use the base of a flat-bottom glass to press down the crumbs.
  4. Chill in the freezer compartment for at least 1 hour.
Filling:
  1. Measure water into a bowl and sprinkle in the gelatin (without stirring with a spoon). Set aside to allow the gelatin grains to swell (10 mins) before setting the bowl over a pot of simmering hot water. Swelling will make the granules melt much easier & faster.
  2. Stir with a spoon and once the gelatin melts, remove the bowl from the pot and set aside to cool to room temperature.
  3. Beat the cream cheese and sugar together until smooth (either using electric mixer or hand whisk also can).
  4. Add in the gelatin solution and yogurt, beat till the mixture turns smooth.
  5. Divide mixture evenly into two bowls (about 1 cup each).
  6. Add 75ml of Ribena into one of the bowls and mix well with a spatula.
  7. Spoon the two mixtures in alternate blobs into the chilled crust, i.e. Spoon one blob of coloured mixture (with ribena) onto the crust, then spoon one white mixture blob beside it, followed by the coloured mixture and so one. Just alternate the mixtures.
  8. Smooth the surface and use a knife (hold vertically) and swirl through the mixtures to create the marble effect.
  9. Refrigerate until set.
Topping:
  1. Measure water into a bowl and sprinkle in the gelatin. Set aside to allow the gelatin grains to swell (10 mins) before setting the bowl over a pot of simmering hot water. Stir with a spoon and once the gelatin melts, remove bowl from the pot and stir in 80ml of Ribena. Set aside to cool. It is important to allow the cheesecake to set before pouring the jelly topping. Also, when pouring the jelly topping, do be gently. If possible, spoon the jelly mixture. This it to prevent the pressure of the jelly mixture from "eroding" your cheescake. In which, you might end up with floating bits of cheese.
  2. When completely cooled, pour mixture over the cheesecake and chill for several hours or overnight until set.

Monday, October 26, 2009

"Greenie Cake" / "Incredible Hulk Cake"

My last weekend baking project:

Huh!? What is that? Greed tea cake or pandan cake? No, no, no. Not so ordinary ya.

Fresh from oven:

without flash:

with flash :

When I first look at the cake, it does look odd. For those who tried it, none of them can tell what the green stuff is. This is a Spinach Cheese Cake. Who knows after you eat this cake, can get muscles like Popeye or Incredible Hulk. Haha. Spinach + cheddar cheese = odd combination. But taste great! Oh yes, I am an advanterous person, even in baking. Dare to try out odd recipes

Ingredients:
Spinach (chopped) 100gm
Butter 150gm
Icing sugar 150gm
Eggs 4 nos
Flour 150gm
Corn flour 25gm
Baking powder 0.5 tsp
Cheddar cheese 50gm

Method:
  1. Whisk butter + icing sugar until light and fluffy, then slowly add in eggs one by one.
  2. Next add in sifted flour + corn flour + baking powder + spinach and mix well.
  3. Stir in grated cheddar cheese
  4. Pour into a oblong bread tin (lined & greased)
  5. Bake at 170c for 40 minutes

Friday, October 16, 2009

DOM Raisin Cake

I saw this DOM Raisin Cake recipe from the one of the Buffalo cookware newsletters. Looks like an interesting cake. Since I have a big bottle of DOM liquor, why not give it a try?

My results?

I expected my cake to look similar to this photo shown in the recipe. The cake looks browny with lots of raisins topping.


Freshly baked cake, still in the cooker. Hmm... my cake looks pale. And where are the raisins?

After take the cake out from the cooker, my cake looks like this ...
Brown sugar & raisins, where are you?

Cut the cake and see most raisins "sink" to the bottom of the cake. Texture of the cake looks not fluffy enough. It looks like a steamed cake texture rather than a baked cake.
How wonderful that I can use the Smart Cooker to "bake" cake which comes with a "steamed cake" texture. Haiya...


Definately not 100% successful cake. Border pass only. I personally do not really like it because of the texture. But it does come with a strong DOM aroma and can taste the DOM while eat the cake too. Anyway, my colleagues still thought it was a nice cake. Some of them thought it was a steamed cake! I will try to bake this cake again (since the big bottle of DOM still sits in my kitchen cabinet). I will make sure I beat the mixture long enough to get fluffy & smooth texture.

Ingredients:
Butter 250g
Brown sugar 100g
Self raising flour 250g
Eggs 5
Baking powder 1/2 tsp
DOM 150ml
Raisins 150g (soak overnight with DOM. I used 3 boxes of Ligo raisin.)

Methods:
  1. Whisk the butter and brown sugar until mixture is even, light and fluffy.
  2. Slowly add in eggs, one by one.
  3. Add in baking powder and continue to beat until even.
  4. Pour the soaked raisin into the mixture. Stir evenly.
  5. Apply some butter on the inner pot of the Smart Cooker, pour in the cake mixture, select the "Cake" function (the cooker by default set the baking time as 45 minutes).

Healthy Tips:
Raisin is good for rectum's health improvement. It contains fiber and tartaric acid, which can accelerate human's excreta passing through the rectum. Meanwhile reduce contamination in the intestines.

Monday, October 5, 2009

Cheese Sponge Cake

2 weeks ago i baked a Cheese Sponge Cake using the Buffalo Smart Cooker. Simple & straight forward steps. What a big cake! It was quite big serving for a small family like mine. Don't know why my kids refused to eat them *doink* I had to give away half to friends. Next time i should try half all the ingredients and get a smaller cake.


Look at the texture! Soft & spongy. Yummy!