Saturday, January 30, 2010

First Bake of Year 2010 - Hershey's "Perfectly Chocolate" Chocolate Cake

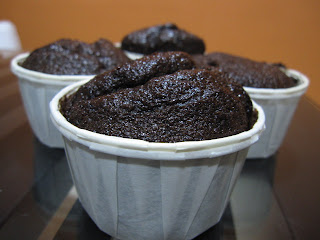
Welcome year 2010! I stopped baking & blogging since school holidays in Nov 2009. Lazy! Haha. Mainly due to I was busy holidaying during Nov & Dec. And when the year started, gosh, I was never been so busy before. This is mainly due to both my boys study at new schools this year - Caden in nursery class at Yuk Yu Kindergarten and Jaden is in Primary 1 at SJK(C) Chung Hwa Likas. Just sending & fetching them to/from schools, to beat the traffic jam itself is a challenging job. On top of that, I was not fully recovered from my cough/flu since Dec 2009. Very, very busy & tiring. Finally last weekend I managed to find some time in a Sunday afternoon. This cake has been in my top of the "must try out" list. I tried to look for Hershey cocoa powder in KK but could not find it until i went to Singapore during X'mas and managed to buy 1 box from there. However, after my Singapore trip, my friend told me that can buy it at Merdeka Supermarket. And it costs slightly cheaper than Singapore Dollars. Sigh! Anyway, I gave it a try and it turned out to be one of my favourite cakes!


It's so moist that I need to double layer the cup cakes.


See how moist the cake is!

I tried the cup cake version. Let's look at the ingredients & steps:

Ingredients:
  • 2 cups sugar (I put 1-3/4 cups. Still very sweet for me. Next time should reduce to 1.5 cups only)
  • 1-3/4 cups all-purpose flour
  • 3/4 cup HERSHEY'S Cocoa
  • 1-1/2 teaspoons baking powder
  • 1-1/2 teaspoons baking soda
  • 1 teaspoon salt
  • 2 eggs
  • 1 cup milk
  • 1/2 cup vegetable oil
  • 2 teaspoons vanilla extract
  • 1 cup boiling water
  • "PERFECTLY CHOCOLATE" CHOCOLATE FROSTING(recipe follows)

Directions:

1. Heat oven to 350°F or 180°C. Grease and flour two 9-inch round baking pans.

2. Stir together sugar, flour, cocoa, baking powder, baking soda and salt in large bowl. Add eggs, milk, oil and vanilla; beat on medium speed of mixer 2 minutes. Stir in boiling water (batter will be thin). Pour batter into prepared pans.

3. Bake 30 to 35 minutes or until wooden pick inserted in center comes out clean. Cool 10 minutes; remove from pans to wire racks. Cool completely. Frost with "PERFECTLY CHOCOLATE" CHOCOLATE FROSTING. 10 to 12 servings.

VARIATIONS:
ONE-PAN CAKE: Grease and flour 13x9x2-inch baking pan. Heat oven to 350° F. Pour batter into prepared pan. Bake 35 to 40 minutes. Cool completely. Frost.

THREE LAYER CAKE: Grease and flour three 8-inch round baking pans. Heat oven to 350°F. Pour batter into prepared pans. Bake 30 to 35 minutes. Cool 10 minutes; remove from pans to wire racks. Cool completely. Frost.

BUNDT CAKE: Grease and flour 12-cup Bundt pan. Heat oven to 350°F. Pour batter into prepared pan. Bake 50 to 55 minutes. Cool 15 minutes; remove from pan to wire rack. Cool completely. Frost.

CUPCAKES: Line muffin cups (2-1/2 inches in diameter) with paper bake cups. Heat oven to 350°F. Fill cups 2/3 full with batter. Bake 22 to 25 minutes. Cool completely. Frost. About 30 cupcakes.


"PERFECTLY CHOCOLATE" CHOCOLATE FROSTING (I omitted this part coz i think the cake is sweet enough.)

1/2 cup (1 stick) butter or margarine
2/3 cup HERSHEY'S Cocoa
3 cups powdered sugar
1/3 cup milk
1 teaspoon vanilla extract

Melt butter. Stir in cocoa. Alternately add powdered sugar and milk, beating to spreading consistency. Add small amount additional milk, if needed. Stir in vanilla. About 2 cups frosting.

Saturday, November 14, 2009

Homemade Snack Bars


Food 4 Tots is one of my favourites blogs. The blogger shares some simple-to-follow recipes and suitable for kids. And the photos taken are great! I really learn a lot for this blog. Thank you very much, Food 4 Tots! The 1st recipe I tried out from this blog is the "Homemade Snack Bars" - simple ingredients and straight forward methods. No electrical mixer, no oven, minor cleaning up! And yet taste good and healthy!

(From Food 4 Tots)
Ingredients:
40g rolled oats
40g sunflower seeds
40g pumpkin seeds
Handful of black and white sesame seeds
3-4 tbsp clear running honey

Methods:
  1. Heat up the pan.
  2. Put the black and white sesame seeds in a non-stick and dry fry (without oil) over a medium-low heat until they are fragrant. Set aside.
  3. Dry fry the oats for 3 mins. Turn the oats occasionally to make sure they cook evenly.
  4. Add the sunflower and pumpkin seeds and dry fry for another 2 minutes or until light golden. Take care – the pumpkin seeds may pop a little!
  5. Return the roasted black and white sesame seeds to the pan and dry fry for ½ min.
  6. Take the pan off the heat. Stir in the honey – it will sizzle at first but keep stirring until the oats and seeds are coated. Allow to cool slightly.
  7. Line a 20cm x 10cm baking tin with greaseproof paper.
  8. Spread the mixture evenly on the paper and line another one on top of the mixture.
  9. Use a presser (or chopping board) to apply pressure to the mixture.
  10. Chill for at least 1 hour, or until solid. Turn it out of the tin and peel off the greaseproof paper. If you have problem to peel off the paper, leave it at room temperature for 1 min and try again. Cut into bars.
  11. Keep it in an air-tight container and store in the fridge. Best to be consumed within a week.

Friday, November 13, 2009

Ribena Marble Cheesecake (non-baked)


When I first tried to do the non-baked Oreo Cheesecake, i failed to whip the cream. So I am quite phobia when it comes to preparing cake with whipped creams. When I found this non-baked cheesecake recipe from Happy Home Baking and Loving Baking, I know I must give it a try. The recipe seems simple. The comments I received from my friends who tried it, they simply love it!

(From Happy Home Baking)

Ingredients
Crust:

150g digestive biscuits, finely crushed (I used Marie Biscuits instead coz don't have digestive biscuits at home)
60g butter, melted

Filling:
100ml water

20g (2 tablespoons) gelatin granules/powder
250g cream cheese, soften at room temperature

75g caster sugar
250ml natural plain yogurt

75ml Ribena blackcurrant juice cordial


Topping: (i omitted this. You can refer to
Loving Baking who tried the topping.)
100ml water

2 teaspoons gelatin granules/powder
80ml Ribena blackcurrant juice cordial

Method:

Crust:
  1. Line the sides of a 20cm round pan with aluminium foil (which extends out 2-3 cm at the side of the pan for easily lifting after the cake is chilled), set aside.
  2. To make the crust, combine crushed digestive biscuits and melted butter together in a mixing bowl.
  3. With the back of a spoon, press the biscuit crumbs onto the base of the prepared pan. To ensure the crust is even, use the base of a flat-bottom glass to press down the crumbs.
  4. Chill in the freezer compartment for at least 1 hour.
Filling:
  1. Measure water into a bowl and sprinkle in the gelatin (without stirring with a spoon). Set aside to allow the gelatin grains to swell (10 mins) before setting the bowl over a pot of simmering hot water. Swelling will make the granules melt much easier & faster.
  2. Stir with a spoon and once the gelatin melts, remove the bowl from the pot and set aside to cool to room temperature.
  3. Beat the cream cheese and sugar together until smooth (either using electric mixer or hand whisk also can).
  4. Add in the gelatin solution and yogurt, beat till the mixture turns smooth.
  5. Divide mixture evenly into two bowls (about 1 cup each).
  6. Add 75ml of Ribena into one of the bowls and mix well with a spatula.
  7. Spoon the two mixtures in alternate blobs into the chilled crust, i.e. Spoon one blob of coloured mixture (with ribena) onto the crust, then spoon one white mixture blob beside it, followed by the coloured mixture and so one. Just alternate the mixtures.
  8. Smooth the surface and use a knife (hold vertically) and swirl through the mixtures to create the marble effect.
  9. Refrigerate until set.
Topping:
  1. Measure water into a bowl and sprinkle in the gelatin. Set aside to allow the gelatin grains to swell (10 mins) before setting the bowl over a pot of simmering hot water. Stir with a spoon and once the gelatin melts, remove bowl from the pot and stir in 80ml of Ribena. Set aside to cool. It is important to allow the cheesecake to set before pouring the jelly topping. Also, when pouring the jelly topping, do be gently. If possible, spoon the jelly mixture. This it to prevent the pressure of the jelly mixture from "eroding" your cheescake. In which, you might end up with floating bits of cheese.
  2. When completely cooled, pour mixture over the cheesecake and chill for several hours or overnight until set.

Wednesday, November 11, 2009

Woof! Woof!

Last Friday I took a day off to attend Jaden's graduation ceremony in the morning and busy baking in the afternoon for Caden's playschool concert on last Sunday. There was a pot luck after the concert. I promised to bring the Horlicks Doggies Cookies on that day. Since this was the second attempt, I was confident that I would baked nice doggies cookies this time.

Unfortunately, things went wrong. I over-baked the 1st batch of cookies, about 30 of them. The cookies were burnt and cracked, as if the doggies put on masks like Zorro. They looked awful. I had to throw away the whole 1st batch. I monitored closely while baking 2nd batch, luckily it was ok, but only less than 20 pieces of them. Why over-baked? I suspect I stored the choc chips in the fridge, and they are burnt faster than room temperature choc chips while in oven. Not sure.

I decided to go for 3rd attempt to bake more cookies on Sat night. But before that, I baked a cheese sponge cake using the Buffalo Smart Cooker, since this can yield a high successful rate. Then I moved on with the Doggies Cookies. 1st batch ok. While 2nd batch, I ran out of baking papers! Left with 2 thin stripes only. I had to place the cookies near to each other, and brushed some butter on the tray for those cookies without baking papers. Luckily all cookies were nicely baked. What a busy night. I didn't even have time to go for dinner. Let's see my hard work :


Hope you like these cookies. Woof woof!

Tuesday, November 3, 2009

Cola Chicken


Last night I prepared simple dishes for dinner: 1) Chicken & corn soup, 2) Cola Chicken, 3) stir-fry mix vegetables. Thanks Ohbin for the Cola Chicken recipe. My kids finished all their meals in a record breaking time, without having me to scream at them to finish their meals.

(From Ohbin)

Ingredients:
1 whole chicken (I used 6 chicken wings)
Cola 1 can (i used half can only I only used 6 chicken wings)
Anister 2 pieces
Cooking wine 1T
Soy sauce 2T
Dark soy sauce 2T
Onion, ginger & garlic

Method:

  1. Rinse chicken in hot water. Put oil in wok/pan, fry onion, garlic & ginger until fragrant.
  2. Put in chicken and fry. Pour Cola in.
  3. Stew the chicken with low heat, until gravy is thicken and ready to serve.

Sunday, November 1, 2009

What Can My Kids Do For Me?

- Protect me with their kungfu fighting skills.


(errr... this one not really protect me la. More on protecting his precious lantern.)

- Help to wash the plates after dinner.
(even though I need to wash for second time
to make sure all clean).


- Help to wash my car.
(errr.. with their pants!!! Wow, butt-naked free car wash, anyone?)


- Surprise me with their creativity or skills.


(Actually he does not know how to play piano. But he knows how to pretend he knows how to play.)

- Make me laugh with their funny faces.


They are my Superheros!


Saturday, October 31, 2009

Family Portrait II

This time is Caden's masterpieces:

So cute, huh? Without the teacher's caption, I don't think I can understand his drawing at all.
And this one:
Huh!? "The Mummy", "King Kong", "Hancock" ???
Uh-Oh! I think he watched too many movies on HBO. May be it's time to unsubcribe the Movie Package on Astro.